
Say No to Freeze-Dried: Our Favorite Camp Cooking Methods
Camp cooking real food over a Coleman stove or open fire is an obvious choice if you are car-camping. But what do you do on minimalist, self-supported outings, when carrying large implements and cookware is out of the question?
You can still easily avoid eating freeze-dried meals and packaged meal replacement bars. While these may be unavoidable if you’re on a multi-day biking or hiking trek through the middle of nowhere, short 1-2 day adventures allow you enjoy delicious real food, that is not walking tacos. In fact, that’s one of my favorite things about short trips: there are very few foods that —with minimal preparation— can’t be safely packed to bring on such outings. (BTW, here are my 10 favorite edibles to pack on outdoor adventures).
As to preparation, here are my tried and true camp cooking methods that are light on equipment, and produce delicious results.
Cooking on a stick
This old-school camp cooking method has been passed down to me by my dad, and requires only a knife and some matches.
Equipment needed
This usually requires the ability to build a campfire, but I have also successfully cooked on a stick over a Vargo Hexagon stove.
A long (2-3' foot) fairly rigid and straight stick. Check to make sure it’s not brittle before using. It goes without saying you should use sticks found on the ground, and not cut them from living trees.
Pocket knife to whittle the end of the stick to a sharp point.
Foods best suited
Smoked Polish sausage (I haven’t tried a meat-free substitute, but be my guest and let me know how it goes)
Precooked chicken chunks (bacon slices wrapped around the chunks make a nice, juicy coating)
Whole mushrooms
Onion wedges
Bell pepper slices
Any combination of the above skewered shish-kabob style
Method
Skewer your selection of foods securely on to the sharpened stick, and roast slowly by holding over a hot campfire. Avoid putting food directly into the flames, except maybe for some last-minute charring. Cool slightly and enjoy!
Hobo Skillet Cooking
This is probably better suited to shorter days trips, as you may not want to lug a cast iron skillet on an overnight backpacking trip or long hike. Though, if you're traveling by bike, the little extra weight may be worth it, since this camp cooking method produces spectacular results.
Equipment needed
Campfire with cooking grate or any type of backpacking or camp stove that uses canister fuel
Small seasoned cast iron skillet works well on trips when you’re not too worried about the weight. (You can use a skillet that comes with your camping cookset, but you might not get the same browning results that cast iron yields, and cleanup is more difficult).
Fork or small spatula
Foods best suited
Pre-cooked potato chunks
Bacon or breakfast sausage chunks, or plant based substitutes
Precooked ground beef
Any pre-chopped vegetable (onion, pepper, mushroom, celery, zucchini, broccoli, etc)
Eggs
Cheese
If not using bacon, toss everything with a little olive oil before packing
Method
Before heading on your journey, pack prepped ingredients. I like to use aluminum foil lined with parchment, but a Ziploc baggie works too. Add salt, herbs and spices to taste, and seal securely for transport. Pack cheese separately.
For transporting uncooked eggs, I cut off a portion of the egg carton big enough to carry the number of eggs I will need.
Heat up your skillet, and add your prepared ingredients, excluding eggs & cheese.
Cook until hot and sizzling, shaking the pan or stirring occasionally with a spatula.
When hot, crack in the eggs and stir to cook. Top with cheese.
Best eaten right out of the pan.
If you’re feeding more than one person, I suggest cooking each serving separately to avoid crowding.
Boil in a bag
This method is especially useful if you want to minimize pot cleanup after your camp cooking, or when you need to use the same pot for cooking a meal and making coffee the next day.
Equipment needed
Backpacking stove & fuel
Camping cookpot
Plastic freezer bag, quart size
Foods best suited
Precooked chili, , chili-mac, spaghetti, curry, stew etc.
Precooked rice
Ready-made bagged veggie curry meals
Method
Bring water to a boil in a pot
Turn off heat, and let water cool until no longer bubbling (do not put Ziploc bag into boiling water)
Carefully place your bagged food in the water, and cover, or drape a cloth over it to keep hot for 5-10 minutes.
Remove bag, open carefully to let steam escape, and enjoy.
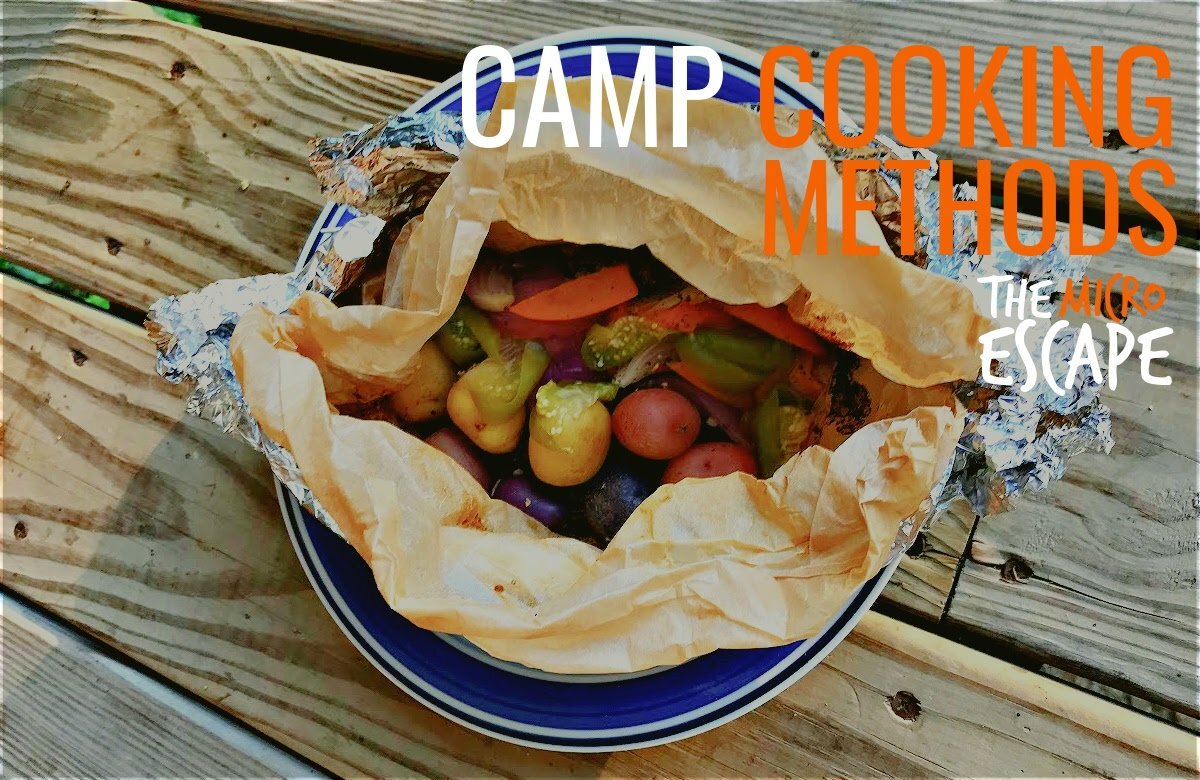
Foil Packet Cooking
This is an amazing way to prepare virtually a gourmet meal. You will not believe this is camp cooking!
Equipment needed
Campfire or campground grill with cooking grate
Heavy duty aluminum foil and parchment paper
Foods best suited
Fish. Do not precook the fish. This method works great for situations where you can either (1) keep the raw fish cool until cooking time, or (2) prepare freshly caught fish.
Ground beef or sausage (raw or precooked), veggie substitutes work as well.
Chicken strips (raw or precooked)
Potatoes (raw or precooked)
Vegetables
Method
Line a rectangle of aluminum foil with same size piece of parchment.
Place all ingredients in the center of the parchment.
Add seasonings and a small amount of olive oil
Lift up opposite edges of parchment, and roll them down toward the food to make a seal, and tuck the loose edges under around the food.
Wrap foil tightly around the parchment packet
When ready to cook, place the foil packets on a cooking grate over a fire out of direct flame. Cook undisturbed until done. Fish and precooked meats will take 20-25 minutes. Allow up to 45 minutes if starting with uncooked meat and potatoes.
Carefully open the packets to let steam escape, and cool slightly before eating.
What are your favorite camping foods? We’d love to hear about your own outdoor recipes and preparation methods!